Posts

Line Design

Image
This is a lesson that reinforces the elements of art and principles of design (line,color, pattern and repetition).  We start out by dividing a 12x18 sheet of white paper with a black marker. Students may divide the paper using any type of line, remembering to make large sections to design in. After they divide the paper students use colored markers and begin designing using as many types of lines they can think of. (I have a large patter and line poster in the room when students seem to get blocked for ideas). I tell the students not to color in sections  but use the lines as the filler.              This Quality check board serves two purposes, one to show students what type of quality work I expect on all projects and this serves as a large scale rubric to show them what score is possible for the quality they give me on this Line Design project.

Cookie Monster Painting

Image
    Kindergarten "Cookie Monster Painting" was fun, the kids really enjoyed painting their cookie monster and adding brown and black for the cookies.  This lesson focused on texture and color. Below are a few examples of Cookie Monster.    

Edvard Munch

Image
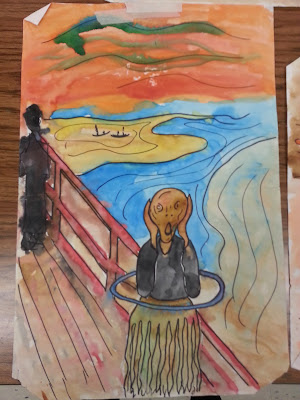
      Edvard Munch's "Scream"is one of my favorite lessons to do with my 7th and 8th grade students. We start by discussing Edvard Munch and examine his work. I pose this question to the class to spark a discussion "Why is the character screaming in the painting?" I love looking at my students faces after I ask this question because you can see that the wheels are turning and the imaginations are flying. Below are a few of my examples I will post the student examples as soon as they are finished.  This was done on 12x18 white paper with watercolor paint. My students used tempera.            Embarrassment  Fear Frustration

Symmetrical Faces

Image
  This is a lesson that I do every year with my fourth grade classes. They love being able to create any face they want.          Step one take two pieces of 9x12 contrasting colors of construction paper and fold them in half. If you fold it the long way the face will be elongated and if you fold it the short way like a book, the face will be wide.       Now, after you fold both sheets, cut them in half on the folded crease. Take one half of your paper and draw half of a face.                     Now, place both halves together and you'll get one whole face. Use the extra scraps to add details. I usually give my students specific details to add to see their cutting and gluing skills.(three part eyes, hair, neck and shoulders to start).   Here are a few finished and almost finished pieces.    

How do you celebrate your student artist?

Image
How do art teachers celebrate their young artist?   I know many of us as art teacher celebrate our students once a year during our annual art shows but that's only one time during the year and maybe not all students are able to participate in it. So what do you do? During our school wide assembly each grade level chooses two students a boy and a girl as Student of the Month. Students are chosen not by grades alone but growth, effort and improvement through out the month. I started thinking what could I do to celebrate students for working just as hard in art. So, I started the Student Artist of The Month. Each month I select one boy and one girl, from lower elementary and the other from Middle school (I teach K-8 art).  I choose students not on their ability in art, but how well they improved during the month. Whether it be behavior changes, team work, improved self-motivation or worked through some challenges during the month I look at many areas. ...

Monkey Painting

Image
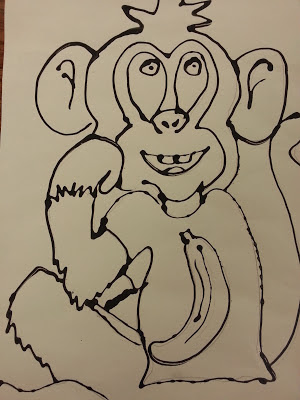
 Here is a quick lesson on Monkey's...I love monkeys!  I did this project with my 6th graders and we focused our lesson on the painting called the Blue Dog byGeorge Rodrigue. Instead of typically doing a dog we discussed as a class what other animals we could do as a series like George Rodrigue. We came up with the Monkey. We started out by drawing sketeches of our monkey using some example sheets that I prepared. We drew our monkey keeping in mind that we wanted to make this memorable, so we added either a unique background or article of clothing to our picture. After drawing it on white 12x18 paper we used black elmers glue and traced our picture. Lastly, after a good drying time we using water color to paint our monkeys. Below is one example of our monkey painting. Things you need: elmers glue mixed with black tempera Watercolor paint (any variety will do) Pencils Monkey images Example of George Rodrigue Blue Dog 12x18 white paper

Clay Bells

Image
This lesson is called Character Bells. My 7th and 8th grade students created a bell using the pinch pot method. We started out by rolling a ball of clay the size of a baseball. Next, we stuck our thumb into the ball and created a hallow opening. Lastly, we took extra clay and created a unique character for the top of our bell. Underneath each one of these is a fishing wire string and clay ball. The rounder the opening the better the ring. The kids loved it and had a great time making them .