Posts

Showing posts from October, 2018

Spider Webs

Image
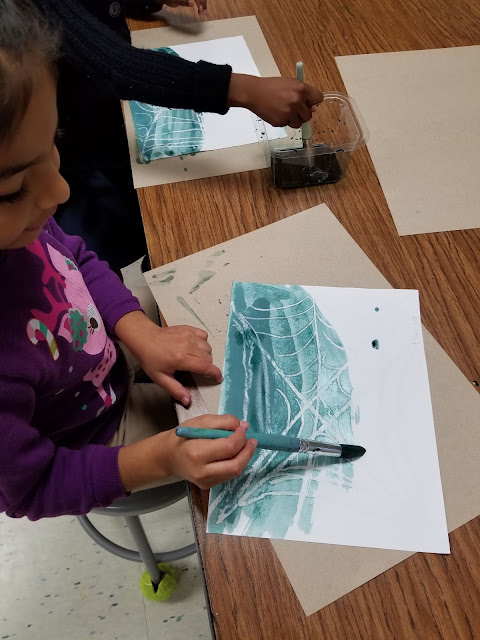
 I love this lesson! It teaches students how to use lines in a picture. And what better way than to teach students how to make a spider web. It's a great review of types of lines. We covered straight and curved lines in this lesson, of course they love it! Supplies used: 9 x 12 inch white paper white oil pastel (white crayon) Black or blue liquid water color Brushes For this lesson I did a teacher led demonstration on how to draw a spiderweb using a pencil. I love to practice before going straight into a lesson. Especially something like this with first grade. So, day 1 is practice. Day 2 they show me what they have learned by using a white oil pastel to draw their spider web, and yes you can see it on the white paper. Once they have drawn their spider web it's time to add the liquid watercolor. I have three first grade classes to do this with so recycling the liquid watercolor works. My example Adding the spider Once they were dry we used black

Student Art Portfolios

Image
This year I am trying very hard to get my students to be data minded and presentation ready. My 5th-8th grade students are building portfolios this year. To keep things simple and not get so overwhelmed, I am making them out of large 18 x 24 inch white paper simply folded in half. On the cover students will decorate and design their name. My example  On the inside cover I have created a Student Data Sheet where students will enter their grades and create a bar graph to see there growth and what areas they have already mastered. Now mind you, this is my second year doing this and I'm still revamping this sheet but so far its simple and the kids can manage it without my assistance. We simply taped it on the inside cover.   https://1drv.ms/w/s!Asp9n-oM03mC9FmMkp0P7AXp4Hwb . Here's a link to the Data sheet. Feel free to use and make your necessary changes. Data Sheet Inside of their portfolios we will keep each graded artwork. All portfolios are stored in a large

Graffiti Name Design

Image
        Sometimes it can be difficult trying to create lessons that will engage middle school students. This lesson is from a workshop that I did using modeling paste to create textured paintings. Since I have a lot of boys in my class that love graffiti I thought "Why not?", lets create our own graffiti walls. So we did! We used Modeling paste and a brick wall stencil to create the wall and while that was drying we learned to create graffiti names. Check out the videos and images below of there amazing work. Supplies used:  Flexible Modeling paste Cardboard any size Palette Knife Tempera paint (red) (black) brushes Sticky foam cubes Glue White 8 x 11 inch Tag board Scissors Markers Colored Pencils Crayons Painting our brick walls  Adding shadows to create dimension   Cutting out our names Here are few completed projects.

Art Supply Organization

Image
This year my goal is to make my room more streamed lined. So I found these great baskets at the dollar store. Unfortunately, they only come in three colors, so Rust-Oleum to the rescue! I painted three baskets to coordinate with my table colors in the room. So I now have my warm and cool color baskets. Here's what's going in the baskets, each table will have wipe boards, expo markers w/erasers, crayons, scissors, pencils and erasers. I also color coordinated my wipe board erasers and expo markers. Amazon order, 30 wipe boards, markers and erasers. They're a big hit!  The kids loved it!  They were so engaged!

Construction paper cats

Image
 The "Cat's" out the bag folks!  Yes, second starting making construction paper cats. I don't know where I got this lesson but it has been in my bag of tricks for years. It's my go to for second grade.  Its very easy to make and the kids love that they can stand up all by themselves. Supplies used: Construction paper (Neutral colors) 6x6 and one 9x12 Scissors Glue Pencils/Eraser Extra scraps I took a 12 x 18 sheet of paper and split it into two to make my 6x6 inch square and 9x12 inch rectangle Fold 9x12 inch sheet in half Near the open portion of the folded paper draw a circle and cut it out. Add a tail and extra details Cute!

PLAYING TAG WITH MIDDLE SCHOOL STUDENTS

Image
So have you ever played Tag with middle school students? No, I don't mean running around the room screaming and tapping someone. I'm talking about a fun way for students to peer critic. T.A.G stands for This is inspired by the wonderful art instructors at the Art of Education.   How it works? First my students finish a project and without grading it I placed each paper on the table.  Next to each art project I placed empty sticky notes and a pencil. Each student is to write a TAG for the art piece that is in front of them. Now, of course you may have absent students or students who do not do the project, so for those students I make them TAG a project even if someone has already tagged it, (so there may be two people tagging one piece of art work).  More than one piece of feedback is great.  Students can start when the music begins, when the music stops they stop and TAG the piece that's in front of them. We repeat the process 3-4 more times. When we are fini

Scratch Art

Image
We have all used a scratch board or made one at some point in our early learning or art teacher  careers. So I thought I'd try it again cause I think its fun and my current students have not tried the process yet. This  lesson can be used for any grade level. I used this with my 6th-8th grade students.  I created a short video tutorial for my students so they could see the process. I've shared it below.  I'm starting to have fun creating these videos! On the positive, it gives me a chance to save my voice, and sometimes its hard to demo with a large class. I want everyone to see even the smallest details, so a video lets all participants see the action.   Supplies Used: 12 x 12 inch White paper Oil Pastel (variety of colors) Black tempera paint (thick is better or good quality) Dish soap Skewers My example used with acrylic paint.  We learned that using washable tempera made the surface thin. So the better the paint the better the s

Pete Cromer Painted Paper Collage

Image
My Mixed Media 6th, 7th, and 8th grade students just finished this fun painted paper collage inspired by artist Pete Cromer. Check him out on Instagram @PeteCromer or Petecromer.com/ . We started with painting 2 12 x 18 inch paper with colors that would make a great animal design. Once dry we cut our painted papers and began creating some unique animal designs. Below you'll find a few focused learners examples. Supplies Used: 12 x 18 inch white paper Tempera paint (variety of colors) Scissors Glue Pencils Construction paper Brushes Pete Cromer examples My example  My quick video introduction for my Mixed media students.